Hobbyist Forums banner

TycoPro and TycoPro II

14K views 45 replies 7 participants last post by  cbwho  
#1 ·
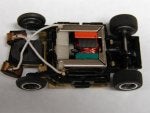
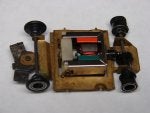
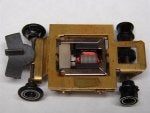
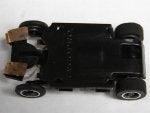
I've spent the past few evenings fooling with TycoPros. I got my single black drop arm chassis running, but the pick-ups are a bastard to keep adjusted. The car likes to stutter through the turns. The flags were damaged and tarnished. I tried flattening them and they seemed to get a little better as they were cleaned by running them. The car got a lot better once I trimmed the damaged portion off the flags. The flags are now rather short and the car still stutters through a couple of the turns on my track, but not on every lap.

Anyone have any hints on tunning the drop arm chassis? It appears to be a superior design and "should" work better than the button style chassis. Or is it just a turd of a design that will do little besides frustrate the user? LOL

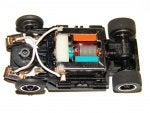
The button style pickups seem to lift the front end into the stratosphere and lift the front wheels off the track. The Chaprral 2D looks like an AW X-Traction on the track. Is the "fix" for this bending the "tounge" at the front of the brass pan up until the front wheels make contact.

On a more positive note. I've found that a true running rear end with a pair of Rocket Science silicones makes a world of difference. The o-ring style fronts from the JL Xtraction cars fit the front wheels nicely (and stay on).
 
#2 ·
Funny, I took 3 tycopros out of my "gonna EvilBay 'em" box. It was a 1 of each affair: 1 wipers, 1 drop arm, 1 buttons.

My drop arm car runs acceptably but it doesnt like corners. Not that it stalls, but it doesnt have the weight factor of the other 2 designs so flys off the track instead of doing some slide action in the curves and under hard acceleration the front end hops all over the place. I plan to auction it.

The buttons cars mostly have the 'too much spring tension' issue. This one didnt, maybe the previous owner lopped off a coil or 2. BUT, there was some serious oxidation at the base of the buttons killing off the electrical connection, so I pulled them off, polished everything with my dremel but couldnt get the buttons back into the collars on the pickup assembly. Apparently its a one-way deal. So, I rigged up some copper strands thru the collars, did away with the lead wires and barrel tabs, running the strands under the tab retainers right to the barrels. It doesnt swivel so well but handles pretty good and its fast, even though the strands (not braids) need some fiddling with to keep contact with the rails. The 'fix' is to go to http://www.toybaron2.com/tycoproparts.htm buy that AJs oscar wiper assemby and try to adapt to the chassis. I have one of his riggen chassis using that piece and it handles GREAT.

The standard wipers chassis works awesome. I did the same wiper polishing and straightening as you, completely tore down and polished all electrical parts including all of the stock redwire HT-50 motor, vented its endbell, used the same JL XT front tires trick and fitted the rear end with stock 440 X2 hubs with Bud's silicones made for 440s. In fact, I put that same wheel/tire combo on all of these since the stock ones are too tall and narrow to handle worth anything. I may try some AJs delrin hubs with those lo profile silicones since theyre the hot ticket on black curvehuggers. With its ultra-lite Bruce Gavins tyco drag bug repro body its easily the best running tycopro Ive ever been able to build. Its actually a match for that Riggen now.
 
#3 ·
Small world. I recently traded for a Riggen here. I need to get pickups and tires on on it and try it out.

My drop arm chassis also hops the front end under acceleration. I'm not sure if it is due to the track joints or the drop arm hitting the stopper on the chassis or the slop in the front wheels. It is one of the few chassis I have where the front wheels are actually carrying the load. It may need more weight on both the arm and the front of the chassis or just one one of those. The only reason I've read/heard for Tyco switching off the drop arm setup was cost, and that was speculation. I have another set of full length wipers that I may try (they were going on the Riggen). Having read your experience with the std. wiper chassis, I'll probably give one a try sooner rather than later.

I've been brainstorming about how to modify the button style pickups. First I need to get the spring tension right or adjustable. Shortening the spring will reduce the preload, but make the spring stiffer through compression (something that may be desirable). I'm also certain that I can solder lead wires to the inside of the top of the "button tubes" and bypass the button shaft/eyelet connection from the electrical path. Then run the wire directly to the ends of the brush tubes. The button wipers clackety-clack is annoying, but they could be almost mainentance free if I can set them up to work better.

How/why do you vent the endbell on the motor?
 
#4 ·
HA! Even smaller world. I tried to trade for that Riggen (The guy was new, his name was Shon, I think?) but you beat me to it. That site riggenho.com I linked has every replacement part you could want for a Riggen. Ive got 2 more build kits coming, one for me, one to try to build and sell on the 'Bay for a little profit.

Honestly, I just think that the drop arm version is just over-engineered. There isnt enough weight in the pan for one thing, not enough in the nose, and if you have too much tension in the wipers its just gonna go badly. If youre starting with fresh, straight wipers you might stand a chance but the ones on mine were pretty mangled up. I got them more or less straight but theyre still a bit 'ripply'. This applies to any wiper-style chassis. But over all, Id say ebay it and find some standard wipers type chassis. Out of the 3 of those, my regular wipers car would flat smoke the other 2 until I used copper strands on the buttons car. That evened things up.

I had the same wire-to-the-button idea on those tycopro IIs. You would definitely bypass all the spring connections and any corrosion but you still cant tune it. I dont like anything I cant disassemble without destroying. Thats me. So if it were me, Id just buy some trash lots on the 'Bay with some usable wipers assemblies and swap them on, its a direct replacement. The AJs part from riggenho would need some re-engineering but it should be do-able.

I stole the vented endbell idea from Racer's Edge. They sell on Ebay under the name ezshot. They sell tuned complete tycopros as well as modified motors and parts for these and other Tyco HPs. Basically, you cut out a little of the endbell with an exacto (be VERY careful not to slice your fingers apart) so that the commutator is exposed on both sides. Ill have to post some pics later, but basically it allows some more airflow in, cooling the motor. Since everything's now exposed you can clean it easier and if you've ever taken apart a can type motor, theyre usually all crudded up with commutator soot. That can now escape for the most part. Its a really good mod and its worth the extra 5 min it takes to do it when you have a motor pulled apart.
 
#5 ·
I've wanted to try a Riggen for a while. I've read a ton on the Riggenho and Toybaron sites about the Riggen and TycoPro. Adapting the AJ's part is probably just a matter of finding something the right size to bush it into the chassis. A nice brass nut would retain it. The way it's shown on Riggenho is is a bit of a kludge, but cheap.

I've got a couple of the button chassis running well enough for me to keep trying. I need to get the front tires on the track and probably run shunt wires directly from the buttons to the bearing tubes. I'll probably also try shimming the front wheels to take up some of the slop.

I'm not that intrested in squeezing out every bit of speed as I am in making them run consistently and drive more like a 1/24th scale car than an HO. My track is only a 4'x8' and I can only use so much speed.

I got my first TycoPro from Weber Plastic Models for ~ $6.50 and liked the way it handled. I went on a bit of a shopping spree after that. There's one drop arm, 4 wipers, and the rest are button. Nice org. bodies are tough. I guess I just not meant to have a decent 512 beacuse all of the ones I have are junk. A 2D with good glass is another one that eludeds me. Though I have to admit that I was after the chassis and did ok "bottom feeding" for 'em.
 

Attachments

#6 ·
Tee Dub,

After an application of superclean to degrease them I had some good success running tarnex through the springs and buttons to try an remove oxidation. It improved performance. I stretched some springs as well, but thats a dangerous game. LOL

I never could get my button chassis to fly like my chassis with foil pickups so please keep us posted on your progress.
 
#15 ·
I do think that most of the electrical problems with the buttton chassis are due to the reliance on the connection between the buttons and the eyelets. When mine start stuttering, spinning the buttons usually takes care of it for a bit. How do you stretch the springs? So far my experience with the wipers compels me to conquer the button pickups. Yeah, they do sound annoying. A continuous rail track might take care of that :)
 
#7 ·
Twolff--Why are your 512s junk and how bad do you want a nice one? Ive got a duplicate one that outside of missing the window (may have one in my parts box tho) and a few minor paint chips is real nice. The headlite crystal is there, and the chrome rear motor detail is near perfect. That one is the earlier #12 variation like you have in your pics. I also have a #4 verson that seems to be a later HP-2 release. Its a slightly more intense red, and instead of '512 M' on the spoiler, it just says 'ferrari'. It also has the yellow prancing horse shield on the front. This one is near perfect and complete except a hairline crack on one of the little struts on the engine detail.

Now, I see you have 2 porsche 914s. I have one in mothballs right now. Body and paint are near perfect but its missing the rear bumper and the targa bar is busted. Id be willing to work something out here.
 
#8 ·
Bill--Superclean and Tarnex, huh? May have to give it a try sometime. But Ive pretty much given up on the buttons chassis. Someday if I ever find one with a skragged wipers assembly I may try mounting desoldering braid pickups. Ive perfected a conversion for curvehuggers and HP-2s to braids and it really wakes these cars up like nothing else. You just need the right motor combo of arms, magnets and cans to really take advantage of it.
 
#11 ·
And youre right, Bill. The buttons chassis was supposed to be a better thought out tycopro, but in reality its a step backward. Obviously the wipers wear out quickly and they wanted to build something with more longevity but it created its own problems. Too bad the front pickup assembly from a curvehugger or HP-2 wont directly swap without tons of mods, or that would be the hot ticket.
 
#12 · (Edited)
I built-up a wiper chassis. It drives nice when the wipers are in adjustment. I get rear wheel hop if I stomp the throttle exiting the turns. You have to drive it-something that attracts me to these things. It does feel more like a 1/24th scale car than an HO. I used a brass pan over a steel one. Any advantage to using one over the other. I discovered that my drop arm chassis pan is steel :(

I'm using Rocket Science rears that came in a bag of rejects (BOR). I don't know what they are actually supposed to fit, but they are just about perfect on the TycoPro rears. They true and wear in great and get along with my Tomy track. All the other tires I've tried feel too hard with 2 exceptions. Some white X-Traction slicones from midshipsloctcar on eBay and the tires that come with the Model Motoring alu. T-Jet wheels. Both of these are almost as good and wear like iron.

I refirbushed the wipers in a pair of smooth jaw hemostats and cleaned 'em with a pencil eraser. One of the wipers has already perforated and the rear edge is disappearing. I don't think I can take the longevity of the wipers. The performance suffered noticably and the adjustment got more picky once the wiper wore through.

I've got one 512 that is ok except I don't have good glass for it. The really junky one I bought for the glass only to find that it had the wrong glass hot glued in :( Just one of many of my eBay turds. One of the others has the glass glued in with too much glue and it ran down the side windows. If I can remove it w/o destroying it, I'll probably paint it black and it will match the dark windows on the "Gulf colored" Porsche. One of the 914s is complete (even the tailpipe) but the chrome is pretty bad on both of them. The other is missing the targa bar, tailpipe, and driver.

On the Riggen. How are the wipers retained on the Riggen guide flag? Mine has a short post for the wiper hole on the top but nothing to hole the wiper to the flag or hold the guide flag in the chassis. Near as I can determine, the car is a 2nd generation Riggen when they lowered the motor in the chassis and notched the shaker plate in the front corners. I'll get a pic tomrrow.
 

Attachments

#36 ·
thanks for the great pics of how you wired the shunts right into the brush barrels at the sides.i havent soldered anything yet,but i managed to lower the front end(button stlye)with weights on afew laps,and the springs have since compressed down enough so the front tires touch the track.i took off the diode arrangment aswell,and spliced two new wires to the buttons,and wedged them into the brush barrels.i will probably solder the splices,but i get lots of power,so maybe i'll just leave well enough alone..my pics turned out crappy,so i won't bother posting them
 
#14 ·
Anyone know how the drop arm retainer is held in place. I've pried up on mine as hard as I dare. I've only got one and don't have any spares. The diagrams I've been able to find indicate that it snaps onto the little posts that hold the tabs that connect the brush tube to the shunt wire, but mine ain't budging. Thanks in advance.
 
#16 ·
Drop Arm Chassis

I refitted the drop arm chassis with a pair of refirbished wipers and took the shunt wires directly to the brush tubes. I'm using new more flexible wire in all of these now. The combination of the full length wipers and flexible shut wires really brought the drop arm chassis around. when it de-slots, the drop arm pops out of the slot and the car goes more or less straight. The other chassis usually traction roll or flip out of the slot and wind up on their roofs. There looks like there is enough room to add a second drop arm weight, something that I want to try for sure now. I think that would be better than more weight on the front wheels because I'm not noticing the front wheels lifting at all. The drop arm chassis seems to take the throttle better and doesn't wheel hop under hard accleration.

I still need to get the drop arm retainer off so I can clean up the copper tabs that connect to the brush tubes. They are an excellent place to attach lights.
 

Attachments

#17 ·
Nice on that riggen--shoulda been mine! Just kidding, Id have jumped on it too. Youre right, it is a later model, the dropped motor version is like a 2nd generation. There is a little cap that retains the pickup assembly. But it doesnt work very well based on the one repro that I have. I quickly converted to that AJs part from toybaron and it handles a LOT better and is retained with a small piece of vinyl tubing. Since the AJs assembly doesnt need to pivot (it has a slot pin not a blade) it holds just fine. Toybaron can supply the other stuff to restore that chassis, even a slick new body.

Couldnt tell you how that drop arm is retained. I havent tried to tear any of that apart on mine.
 
#18 ·
I was sitting at the bench watching Star Trek TNG yesterday evening and warming the soldering iron when it occured to me that soldering shunts directly to the buttons would prevent them from rotating. The wear patterns on used buttons clearly indicate they are rotating or wear would cut grooves in them. I decided that grooves would probably not be a good thing and turned the iron off.

Bending the tang on the button chassis up just enough to get the front wheels on the track works. The car handles ok. But, as you guys have observed, the button chassis doesn't "fly" like the wiper. It may be a least partially due to the amount of friction in the button pickups and the buttons spinning. If spinning brushes in T-Jet sap the power out of it, it is not unreasonable for the spinning pickup buttons to do similar. I can run the car very hard setup like this. Now the old shunt wires are breaking loose from the copper tangs due to flexing. They solder back up, but will eventually be too short. I imagine that this has always been a problem as the wire used does not have a lot of strands. The wire I used to replace the shunt wires on the wiper chassis is scrap from a RC airplane servo ans is very flexiable stuff.

Ran the drop arm chassis some more and found that running at 14v and using a 90 ohm controller is a real sweet spot for the car. I can use the full range of the controller and really drive it through the turns.
 
#19 ·
Dunno about the rotating buttons. I dont think it'd affect things the way that rotating motor brushes do. Youre just picking up power from the rails, so it'd seem that so long as the connection was good you'd be fine. Remember in the commutator you have another part spinning a lot of rpms. The combo of the 2 is whats no good. Tyco could have just as easily designed that buttons chassis with pickups that dont rotate as the car goes down the track.
 
#40 · (Edited)
but what about uneven rails?it would also seem to make sense that braids would conform better than buttons to any inconsistencies in the rail height...are buttons just a throw away idea?seems the wipers would be aswell,as they wear out too quick for the racer on the budget,and as they wear out quickly,supplies would become increasingly more rare to come by...
WTF?these are really cool cars,either way...but are seemingly high maintenance...sorta like their 1/1 predecessors...lol
 
#20 · (Edited)
Riggens and Tyco Pros

A couple of things to note:

New Jersey Nostalgia Hobby has (last time I checked) new Tyco Pro wipers. They are plain bare wipers where you have to put on your own shunt wires.

I've had the pleasure of talking with Pat Dennis who worked for Tyco from the 60's into the 70's. He built the original Tyco Pro prototype and it was off to the races from there. He is a great fellow and has some interesting stories to tell about how it all got done. RiggenHO.com plans to feature some of his recounts in the near future.

But the point is: the buttons where made to rotate. They are just enough off-center to achieve this.

I gave up on buttons a while back and just retro-fit with Type Two flags off eBay and wipers from NJNH.

As for the Riggen "Mushroom Cap" that Ron sells, he offers them in a threaded version. This cap combined with the brass indipendent front end set is, I believe the best place to start on chassis setup. The threaded cap can be used with Oscar pin plates, Riggen repro flags, and (my favorite) Tyco Pro Type One drop-arm flags.

Usually a thin shim or washer needs to be placed under the cap to allow for front axle clearance. I have found that handling is adversly affected if the axle is not allowed to rotate unihibited (even though the hubs are independent).

All of our Limited Edition cars on RiggenHO.com that I have done for Ron use Mushroom caps. Check out the IROC LE build specs for the perfect chassis. We start with a chassis modified by Richard Picard to classic drop-motor specs. The drive line is all modern gears, axles and tires. Motors are selected after break-in. Lucky Bob's lead weight is added to adjust for understeer.

For that edition we utilized modified Oscar plates. The chassis retained the small flag hole. The Oscar plate mounting post was cut down and prethreaded for the cap. The plate can then be held tight inplace with the screw-down cap.

The Tyco Pro Type One flag installation is far easier. The post OD is perfect for the standard chassis mounting hole. The threaded tension is perfect to get the cap and flag to freely rotate but with minimal slop.

Type One flags are in short supply to none. Eventhough the original factory molds are long lost, Pat says he has a process to do limited runs of flags should there prove to be enough demand.

Within the next two weeks, RiggenHO.com will be offering another 24 car Limited Edition. These offers have been done on a first-come-first-served basis. If you are interested, please email Ron to be put on the notification list.

Thanks,

TF
 
#21 · (Edited)
Thanks for the tips. Some additional things to try now.

I haven't been doing much tuning this past week. I do prefer the drop-arm chassis setup over the type II wiper and the type II wiper is way better than the button. The Button chassis do handle better with the front wheels on the track. I'm going to try heating the buttons from the top and see if I can soften the spring rate to allow enough "sag" for the fron twheels to touch the track w/o bending the chassis. It might also take sorting through the button pick-up flags to find the ones that have the desired preload on the springs. The spinning of the buttons has to be about the only thing that keeps the button/eyelet interface at all clean. All the button chassis are slower than the wiper chassis and the button chassis that have been run-in only go south when there is a problem with the shunt wires. I haven't come up with anything elegant to replace the shunt wires on the button pick-ups yet.
 
#24 ·
Look closley. The wires are on the same "side" but are not electrically connected. I've got a few of the setups you describe. All lighted chassis. I think that the thing between the terminals is a diode. I don't know what it is supposed to do. It may be for noise supression. Or provides a load so the light comes on before the car moves. It may also have an effect on braking??
 
#32 ·
You dont need a very hot iron, if you have a hot one you have to solder FAST!!!!!!!!! to keep from melting the plastic, I use regular copper pipe flux paste , NON acid flux an NON acid solder is a must!!! an make sure you use flux on both parts wire an shoe an it will solder together fast with minimal heating of the plastic